
Generally gardeners have up until mid April to enjoy some ‘time off’ from gardening activity. It is our dress rehearsal for the busy season ahead. The many tasks that thrust themselves upon the gardener when the weather finally warms up the soil minimize the opportunities for day dreaming and planning. Our response to the flowering bulbs pushing their way up through the spring soil and the ensuing weeds that push their way past them is to simply get to work. We rake and fertilize the lawn, spread mulch and remove winter debris from the garden just as soon as the weather calls us out of our reclining chair by the fireplace. It is the beginning of the beginning. Seldom during the gardening season do we sit long enough to let our thoughts wander off the beaten path, at least not the way that we do in the ‘off’ season. The point is that we need to take advantage of the situation now: get some serious planning and dreaming out of the way before the work begins in earnest. And it is time for some warm-up activity in the form of tuber forcing.
Plant Dahlias Now
The aforementioned tubers are the dahlias that you dug up last fall and placed in an insulated craft bag and placed in the basement. These should be removed from their hiding place and potted up into one gallon sized containers using PRO-MIX® Potting Mix. PRO-MIX® Potting Mix contains a slow release plant food that gradually releases nutrients for up to 9 months. It also contains MycoActive® Organic Growth Enhancer to stimulate vigorous growth. Place your dahlia pots in a bright sunny window. On the floor in front of a sliding door out to the deck works, as you are not likely to use it much until the heat of mid spring hits home. The sun will intensify through the glass door or window, warming the pots of dormant tubers, encouraging them to put down roots before they push new green growth through the surface of the soil. Before planting your dahlia tubers divide the hefty ones that you stored. Look for ‘finger like’ tubers about 5 to 8 centimetres long, with an ‘eye’ at the stem end. Cut each tuber using a clean, sharp knife. Pass the blade over an open flame before using just to be sure that it is sterile. Be sure to plant the tuber with the stem end up and the tapered end down. If you get them sideways or upside down it is not the end of the world as they are smart enough to find their own way, generally speaking. They have been programmed genetically to push roots down and green growth up without any help from us.
Once Started
Once the green growth has pushed through the soil a couple of centimetres it is time to fertilize them with half strength Plant-Prod All Purpose Fertilizer 20-20-20 every two weeks. Give the pot a ½ turn every few days to encourage even growth that does not favour the direction of the sun. Come mid May your dahlias will be large and strong enough to place out of doors in the garden. Choose a sunny, sheltered place where they will not blow over in the wind as they mature. Dahlias started indoors in this way will bloom 4 to 6 weeks earlier than those planted directly into the soil in the garden. By midsummer you will likely have to stake your dahlias with a sturdy 2 x 2 inch wooden stake or using one of the new ‘link stakes’ that are much easier to work with and to look at (as you do not see them!).
Time to Shop
A visit to the garden centre or hardware store this time of year reveals a surprisingly wide assortment of dahlias that can be started indoors, just like the ones that you stored over the winter in your basement. For giant flowering pie-plate sized specimens look for ‘cactus flowering’. These are the ones that the pros grow for competitions come September. This native of Mexico, Central American and Columbia was first exported to Europe in the 1500’s. Since that time it has experienced extensive hybridization and ‘improvement’. For daisy shaped dahlias look for ‘single-flowered’ and for masses of round clusters of dahlias look for ‘pompom’ dahlias. Whatever you choose, I predict you will be hooked on them after your first successful season. You will be giving them away to friends and family come fall and taking pictures that you post on facebook or in digital albums.
Tuberous Begonias
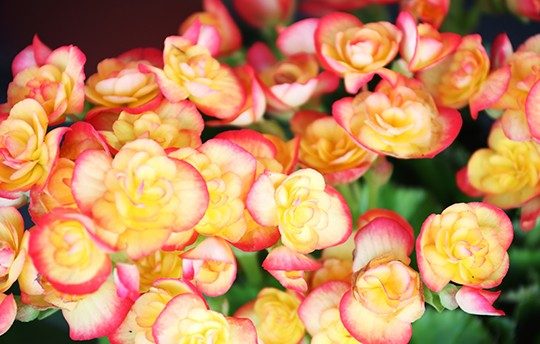
While you are in the mood to shop for summer flowering tubers why not check out the many varieties of tuberous begonias that are available at retailers this time of year. While they have a reputation for growing well in the shade, the truth is that they like about 4 or 5 hours of indirect sun to perform at their very best through the growing season. I start my tuberous begonias this time of year by pushing them with a ‘half twist’ into PRO-MIX® Fortified Peat Moss which has been spread about 2 or 3 cm thick in a seed starting tray. PRO-MIX® Fortified Peat Moss is a combination of organic rich peat moss, fertilizer and limestone. I then place them on top of the refrigerator where the low, ambient heat encourages root growth even without much natural light. They actually root better without light. Once the tubers have produced roots about 3 or 4 cm long it is time to remove them from the damp peat gently and plant them up into 10 cm (4 inch) pots. Use PRO-MIX® Potting Mix in the pots for the best results. Now you put them in a sunny window until mid May when you will plant them out in the garden or into containers. The large rose-like blooms of tuberous begonias have an affluent look to them that makes people stop in their tracks and admire. The many hanging varieties are perfect for hanging baskets and window boxes. Their #1 enemy is wind. #2 is overwatering. Locate to avoid the former and resist the temptation of being guilty of the latter. Let your tuberous begonias enjoy some dryness between watering.